

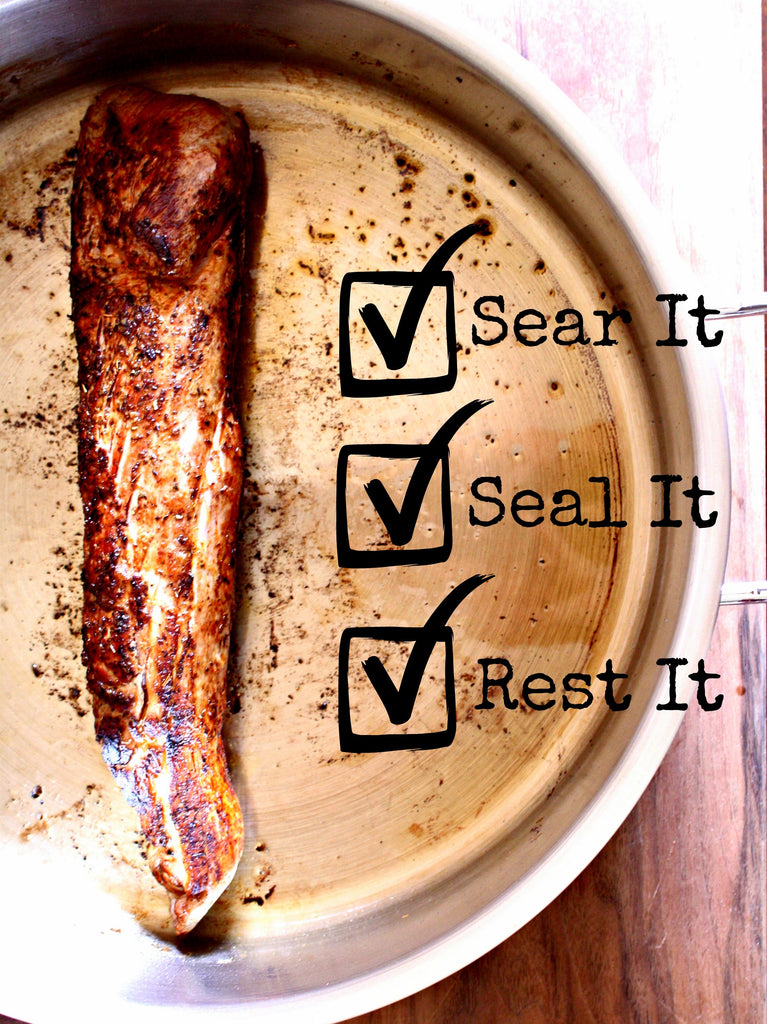
Sear It. Seal It. Rest it. An Essential Kitchen Habit.
Sear It . Seal It . Rest It.
Tommo (ashley) is quite the little cook when she has the free time to let her mind wander, take a deep breath and tackle a recipe she's been wanting to conquer. But the novice cook or chef for that matter can fall into some sloppy mistakes. So when Ash was wrapping a marinated pork loin in aluminum foil to pop in the oven with out having seared it first, I knew this was an important lesson that needed a deeper explanation.
So what is this searing nonsense all these celeb chefs are on about, offering only the briefest of explanations to the benefits before moving on to some useless description of how wonderful what they are cooking smells and how you are somehow missing out. So sealing in detail. Searing to seal is not an optional step. This is not an expression of individualism or part of the creative process. Skipping this step, doing it half right or just "sort of searing" does not save you time. It is not some thing to be discussed, mulled over, debated or deconstructed. It is the difference between wishing you were a good cook, and acting like one.
Hopefully that rant has established this is a good habit that always reaps positive results, like saving change. One does not eat a water melon by eating first through an inch of rind, that simply is not watermelon etiquette and the etiquette of searing no different.
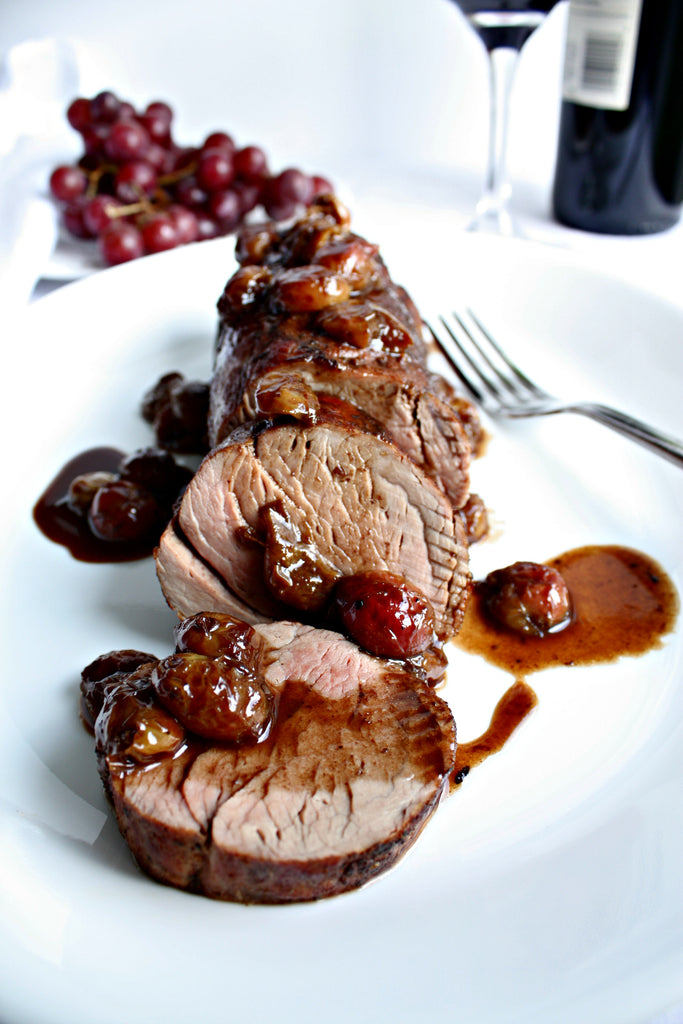
Searing and sealing is especially important with tender delicate cuts like fillet, loins and seafood but it is just as important with tough cuts used for stews, braising and slow roasting.
Number one reason to follow this practice of sealing is to lock in all the juices, riches, and flavor; the whole reason you just spent $24 on two sirloin steaks $28 on duck breast or $40 on two dozen fat Maine scollops right!? Without it you are essentially poaching everything in its own juices and if you want poached food, than read up on poaching.
Secondly, caramelization (with an American "Z" Grrrrr, it's a google thing Australia) That crispy sweet layer of golden browned goodness that is the prelude to the rest of the dish. It adds an unmistakable depth of character to that one ingredient that is of its own and solely its own. Like when mushrooms have that saute earthiness, salmon has that golden crust and crispy skin, duck is rendered to a crunch, scallops have that golden resistance before you slice into that buttery soft interior and well you get the drift.

Okay, so there are a couple of methods to searing and sealing, one as a means to cook the delicate perfectly, like good steak, scollops, shrimp and salmon and the other the preliminary step of roasting or stewing from large whole joints down to smaller chicken breast size cuts. Both cases usually done on the stove top in a large skillet. Let's start with searing a whole joint, if you have a skillet large enough for your cut than it is simple enough. In a hot skillet with a little oil you are simply attaining a golden outside layer on all raw surfaces to as the say "lock in the juices" Have you ever noticed as you cook burgers on the grill that as you grill the 1st side you see the pink juices rise to the uncooked side. Well first that is a definite sign you need a hotter grill or to flip that burger. Now imagine that happening to a whole joint, its entire surface in the oven if you haven't sealed it. Not just for a minute or two but as long as it takes to get that that sealed affect. 20 minutes of juices slowly dripping out…… you picking up what I'm putting down yet?
So you have a super sized cut that isn't fitting in a skillet, well than you'll need to use a roasting pan. Turn your oven on as hot as it will go with the empty roasting pan inside to heat it. Remove it and keep it hot on your stove top, if it covers both burners than turn both those burners on, add a little oil and sear and seal your ginormous cut. Some would argue to simply pop the cut in that very hot over for ten minutes before turning down the oven to a medium heat for slower roasting. Look if you want to, that's fine by me and as a matter of fact it is what I prefer to do for a whole bird, chicken or turkey. For red meat however, I still prefer to sear and seal it as I stated above.
With delicate items like salmon and scollops, it's more about technique and timing
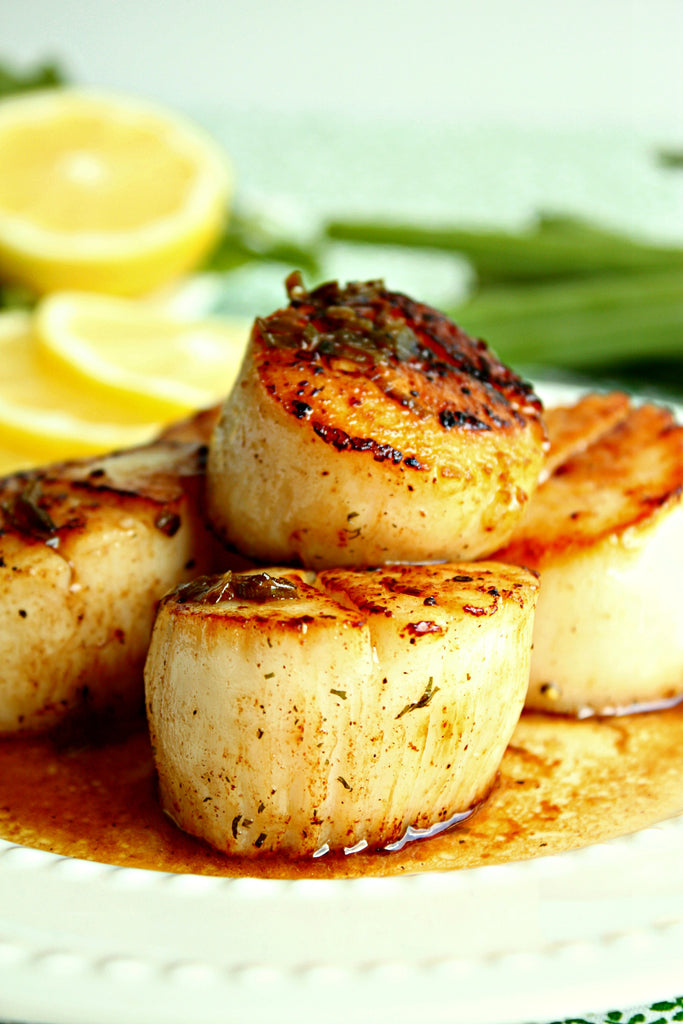
Seared Sea Scallops with Brown Butter Sauce. Recipe Here.
If you need and want rules for caramelization , then start with these:
If you need and want rules for caramelization , then start with these:
- Start with dry ingredients, so pat away all excess moister with a paper towel. Wet things create steam.... steam never caramelized anything.
- Season only moments before you start cooking, salt will draw moister out if left for even just a few minutes and then you've got your wet ingredients problem all over again.
- Hot pan before you add the oil. This is a rule just as searing is a rule. If you want a cold pan cold oil and heat it up together than fine, but it means you're standing around watching a pan of oil for 5 minutes waiting for the "perfect shimmer" to the oil... whatever that is. (how wonderfully vague) Hot pan means less time wasted and guess work and the less time hot oil sits in a hot pan, the better for everyone involved.
- Sear one side, checking to see the perfect amount of browning and caramelization usually achieved in 2 to 3 minutes and turn only once! Just ONCE. Not over, and over, and over like some pancake flipper at a street fair.
Start with these simple steps and you are off to a good start, you pretty much have it in the bag.
So you have hit a sweet drive and you are on the green, now don't go and stuff up the putt and over cook the thing which brings us to timing.
Sure everything has its sweet spot when it comes to timing, its a hard piece of information to google. Ones idea of what is cooked to perfection can get a little skewed and there are so many variables, thickness of cuts, quality of cuts, types of ovens, skillets and power sources ie electric, gas, wood or induction. So when it comes to timing, it's a by feel thing that you will need to learn based on your world, your ingredients and your kitchen. Keeping in mind the object is to avoid over cooking more than under cooking. You can always cook a little longer, it is somewhat more difficult to un-cook anything.
Finally resting. The rule, allow something to rest for half the time it spent cooking, which is a pretty good rule of thumb. Especially if you can drop the outside temp to around 180℉/82℃ to stop carryover cooking and keep it at that temp while it rests. In the home kitchen that can be a pretty unachievable reality and while resting, your cut either keeps cooking, or you end up with a wonderfully rested cold meal... hmmmm??? Look, I rest my roasts, but for a steak I dig in while its searing is still sizzling and crisp. There are plenty of kitchen testing to show how much moister is actually lost if you do or don't rest. The results are smaller than you think and there as so many other factors that effect a steaks juiciness beyond resting. Cooking it properly in the first place being a pretty big one . However in my case any lost moisture is returned to the sauce, is poured back over the meat or is simply still on my dinner plate to rub each forkful in and soak up with crusty bread at the very end.
If you like this post you may also like: